Tuttio Soleil 01 Upgraded DNM Rear Shock Kit
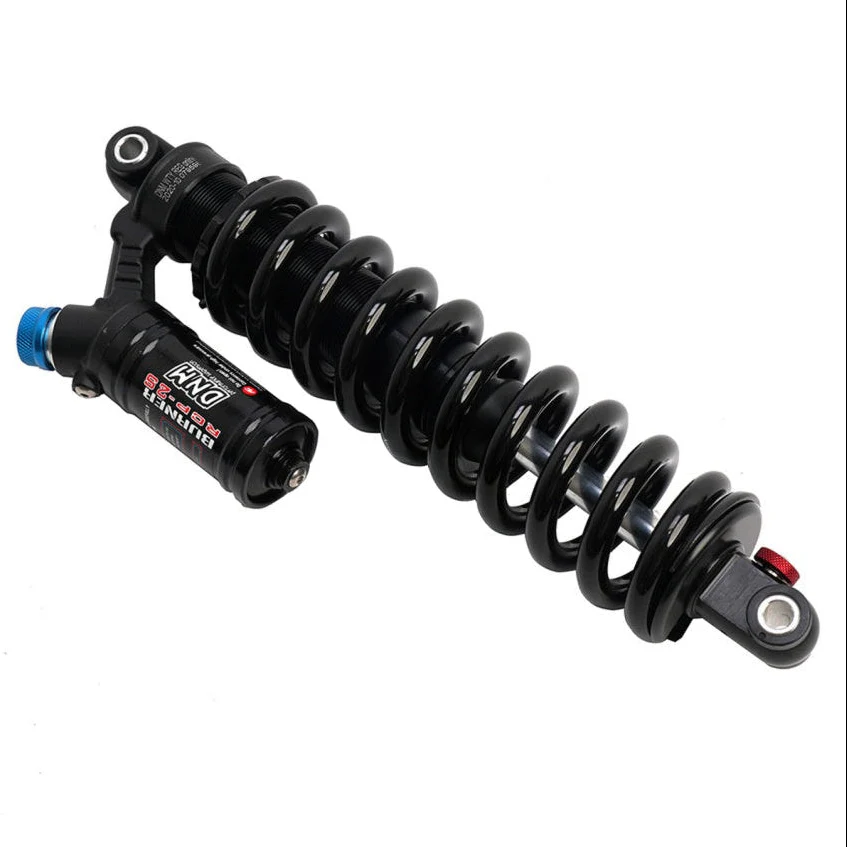
The stock rear suspension on the Tuttio Soleil 01 and Yozma In 10 is one of the single biggest limiting factors to overall performance. It's soft, imprecise, and gets overwhelmed quickly once you start riding with any real commitment. The Soleil Supplies Upgraded DNM Rear Shock Kit replaces the stock unit with a purpose-built 265 mm DNM shock — delivering real damping control, adjustable preload and rebound, and a ride quality that transforms what your bike is capable of on any terrain.
This is one of the highest-impact upgrades you can make. The difference between stock suspension and a proper DNM shock is immediately obvious from your first ride — the whole bike feels more planted, stable, and in control. It's not a subtle improvement.
Fits
- Tuttio Soleil 01
- Yozma In 10
What's Included
- 1x DNM 265 mm rear shock
- All required mounting hardware
- Complete, ready-to-install kit
Features
- Adjustable preload, rebound, and compression — dial the ride in to your weight, terrain, and style
- Proper damping control — night and day vs. the stock shock
- 265 mm length with a 450 lbs/in coil, matched to Tuttio Soleil 01 and Yozma In 10 geometry
- Slightly raises ride height and adds usable rear travel
- Dramatically improves stability, traction, and control
- Better small-bump absorption and big-hit capability — noticeably more comfortable on rocky, choppy terrain
- One of the most transformative performance upgrades available for these bikes
Technical Specifications
| Component | Rear coil-over shock absorber |
|---|---|
| Eye-to-eye length | 265 mm |
| Spring rate | 450 lbs/in |
| Adjustment | Spring preload (threaded collar), rebound, and compression |
| Placement | Rear |
| Fitment | Tuttio Soleil 01 & Yozma In 10 |
| Finish | Black |
| Condition | New |
| Install hardware | Included |
Installation Tips — Do's & Don'ts
This is a direct-fit upgrade and no major modifications are required — all mounting hardware is in the box. A few pointers from real installs:
Do:
- Support the rear of the bike securely on a stand and unload the wheel before removing the old shock.
- Note the orientation of the stock shock and any spacers/bushings before removal so the new one goes in the same way.
- If the lower post is a snug fit, a light filing of the paint in the lower bracket opening is normal to seat it — take off paint, not metal.
- Use the included bushings/spacers so the shock eyes sit snug with no side play.
- Start the top and bottom bolts by hand to confirm alignment before torquing anything.
- Torque the mounting bolts to spec and use thread-locker if the original hardware used it.
- Set your rider sag first (see settings below), then ride and fine-tune.
- Re-check bolt torque after your first ride or two.
Don't:
- Don't work under a bike held up only by the swingarm or a jack — use a proper stand.
- Don't force the shock into the mounts; if it won't line up, re-check spacers and orientation.
- Don't remove metal from the bracket — only clear paint if the post is tight.
- Don't over-tighten the mounting bolts — crushing the bushings can bind the shock and cause harsh action.
- Don't max out the preload collar to "stiffen" the ride — that just removes sag and hurts traction.
- Don't reuse worn or damaged bushings or bolts, and don't skip the post-ride torque check.
Suggested Settings
Treat these as starting points and tune from there. The most important setting is rider sag — how far the shock compresses under your weight in full riding gear.
- Set sag first: back the preload collar off to minimum, sit on the bike in full gear, and measure how much the shock compresses. Aim for roughly 25–30% of travel for a plush trail feel (tighten toward ~15–20% for a firmer, more aggressive setup). Add preload if you sink too deep; back it off if the rear rides high and harsh.
- Rebound (return speed): start in the middle of the range. If the rear feels bouncy or "kicks" after bumps, slow the rebound down; if it packs up and feels harsh over rapid hits, speed it up. Owners note dialing rebound in is what keeps the bike planted.
- Compression: start around the middle. Add compression if you're blowing through the travel or bottoming; reduce it if small bumps feel sharp.
- Lighter riders / smooth trails: less preload and lighter compression for a compliant, high-traction feel.
- Heavier riders / aggressive or jumpy terrain: more preload and firmer compression to hold the bike up in its stroke and resist bottoming.
- Method: change one thing at a time in small increments (a turn or a click), then ride the same section to compare.
Always tune within the shock's marked adjustment range, and never ride with mounting hardware anything less than fully torqued.
Original: $180.00
-65%$180.00
$63.00Tuttio Soleil 01 Upgraded DNM Rear Shock Kit
The stock rear suspension on the Tuttio Soleil 01 and Yozma In 10 is one of the single biggest limiting factors to overall performance. It's soft, imprecise, and gets overwhelmed quickly once you start riding with any real commitment. The Soleil Supplies Upgraded DNM Rear Shock Kit replaces the stock unit with a purpose-built 265 mm DNM shock — delivering real damping control, adjustable preload and rebound, and a ride quality that transforms what your bike is capable of on any terrain.
This is one of the highest-impact upgrades you can make. The difference between stock suspension and a proper DNM shock is immediately obvious from your first ride — the whole bike feels more planted, stable, and in control. It's not a subtle improvement.
Fits
- Tuttio Soleil 01
- Yozma In 10
What's Included
- 1x DNM 265 mm rear shock
- All required mounting hardware
- Complete, ready-to-install kit
Features
- Adjustable preload, rebound, and compression — dial the ride in to your weight, terrain, and style
- Proper damping control — night and day vs. the stock shock
- 265 mm length with a 450 lbs/in coil, matched to Tuttio Soleil 01 and Yozma In 10 geometry
- Slightly raises ride height and adds usable rear travel
- Dramatically improves stability, traction, and control
- Better small-bump absorption and big-hit capability — noticeably more comfortable on rocky, choppy terrain
- One of the most transformative performance upgrades available for these bikes
Technical Specifications
| Component | Rear coil-over shock absorber |
|---|---|
| Eye-to-eye length | 265 mm |
| Spring rate | 450 lbs/in |
| Adjustment | Spring preload (threaded collar), rebound, and compression |
| Placement | Rear |
| Fitment | Tuttio Soleil 01 & Yozma In 10 |
| Finish | Black |
| Condition | New |
| Install hardware | Included |
Installation Tips — Do's & Don'ts
This is a direct-fit upgrade and no major modifications are required — all mounting hardware is in the box. A few pointers from real installs:
Do:
- Support the rear of the bike securely on a stand and unload the wheel before removing the old shock.
- Note the orientation of the stock shock and any spacers/bushings before removal so the new one goes in the same way.
- If the lower post is a snug fit, a light filing of the paint in the lower bracket opening is normal to seat it — take off paint, not metal.
- Use the included bushings/spacers so the shock eyes sit snug with no side play.
- Start the top and bottom bolts by hand to confirm alignment before torquing anything.
- Torque the mounting bolts to spec and use thread-locker if the original hardware used it.
- Set your rider sag first (see settings below), then ride and fine-tune.
- Re-check bolt torque after your first ride or two.
Don't:
- Don't work under a bike held up only by the swingarm or a jack — use a proper stand.
- Don't force the shock into the mounts; if it won't line up, re-check spacers and orientation.
- Don't remove metal from the bracket — only clear paint if the post is tight.
- Don't over-tighten the mounting bolts — crushing the bushings can bind the shock and cause harsh action.
- Don't max out the preload collar to "stiffen" the ride — that just removes sag and hurts traction.
- Don't reuse worn or damaged bushings or bolts, and don't skip the post-ride torque check.
Suggested Settings
Treat these as starting points and tune from there. The most important setting is rider sag — how far the shock compresses under your weight in full riding gear.
- Set sag first: back the preload collar off to minimum, sit on the bike in full gear, and measure how much the shock compresses. Aim for roughly 25–30% of travel for a plush trail feel (tighten toward ~15–20% for a firmer, more aggressive setup). Add preload if you sink too deep; back it off if the rear rides high and harsh.
- Rebound (return speed): start in the middle of the range. If the rear feels bouncy or "kicks" after bumps, slow the rebound down; if it packs up and feels harsh over rapid hits, speed it up. Owners note dialing rebound in is what keeps the bike planted.
- Compression: start around the middle. Add compression if you're blowing through the travel or bottoming; reduce it if small bumps feel sharp.
- Lighter riders / smooth trails: less preload and lighter compression for a compliant, high-traction feel.
- Heavier riders / aggressive or jumpy terrain: more preload and firmer compression to hold the bike up in its stroke and resist bottoming.
- Method: change one thing at a time in small increments (a turn or a click), then ride the same section to compare.
Always tune within the shock's marked adjustment range, and never ride with mounting hardware anything less than fully torqued.
Product Information
Product Information
Shipping & Returns
Shipping & Returns
Description
The stock rear suspension on the Tuttio Soleil 01 and Yozma In 10 is one of the single biggest limiting factors to overall performance. It's soft, imprecise, and gets overwhelmed quickly once you start riding with any real commitment. The Soleil Supplies Upgraded DNM Rear Shock Kit replaces the stock unit with a purpose-built 265 mm DNM shock — delivering real damping control, adjustable preload and rebound, and a ride quality that transforms what your bike is capable of on any terrain.
This is one of the highest-impact upgrades you can make. The difference between stock suspension and a proper DNM shock is immediately obvious from your first ride — the whole bike feels more planted, stable, and in control. It's not a subtle improvement.
Fits
- Tuttio Soleil 01
- Yozma In 10
What's Included
- 1x DNM 265 mm rear shock
- All required mounting hardware
- Complete, ready-to-install kit
Features
- Adjustable preload, rebound, and compression — dial the ride in to your weight, terrain, and style
- Proper damping control — night and day vs. the stock shock
- 265 mm length with a 450 lbs/in coil, matched to Tuttio Soleil 01 and Yozma In 10 geometry
- Slightly raises ride height and adds usable rear travel
- Dramatically improves stability, traction, and control
- Better small-bump absorption and big-hit capability — noticeably more comfortable on rocky, choppy terrain
- One of the most transformative performance upgrades available for these bikes
Technical Specifications
| Component | Rear coil-over shock absorber |
|---|---|
| Eye-to-eye length | 265 mm |
| Spring rate | 450 lbs/in |
| Adjustment | Spring preload (threaded collar), rebound, and compression |
| Placement | Rear |
| Fitment | Tuttio Soleil 01 & Yozma In 10 |
| Finish | Black |
| Condition | New |
| Install hardware | Included |
Installation Tips — Do's & Don'ts
This is a direct-fit upgrade and no major modifications are required — all mounting hardware is in the box. A few pointers from real installs:
Do:
- Support the rear of the bike securely on a stand and unload the wheel before removing the old shock.
- Note the orientation of the stock shock and any spacers/bushings before removal so the new one goes in the same way.
- If the lower post is a snug fit, a light filing of the paint in the lower bracket opening is normal to seat it — take off paint, not metal.
- Use the included bushings/spacers so the shock eyes sit snug with no side play.
- Start the top and bottom bolts by hand to confirm alignment before torquing anything.
- Torque the mounting bolts to spec and use thread-locker if the original hardware used it.
- Set your rider sag first (see settings below), then ride and fine-tune.
- Re-check bolt torque after your first ride or two.
Don't:
- Don't work under a bike held up only by the swingarm or a jack — use a proper stand.
- Don't force the shock into the mounts; if it won't line up, re-check spacers and orientation.
- Don't remove metal from the bracket — only clear paint if the post is tight.
- Don't over-tighten the mounting bolts — crushing the bushings can bind the shock and cause harsh action.
- Don't max out the preload collar to "stiffen" the ride — that just removes sag and hurts traction.
- Don't reuse worn or damaged bushings or bolts, and don't skip the post-ride torque check.
Suggested Settings
Treat these as starting points and tune from there. The most important setting is rider sag — how far the shock compresses under your weight in full riding gear.
- Set sag first: back the preload collar off to minimum, sit on the bike in full gear, and measure how much the shock compresses. Aim for roughly 25–30% of travel for a plush trail feel (tighten toward ~15–20% for a firmer, more aggressive setup). Add preload if you sink too deep; back it off if the rear rides high and harsh.
- Rebound (return speed): start in the middle of the range. If the rear feels bouncy or "kicks" after bumps, slow the rebound down; if it packs up and feels harsh over rapid hits, speed it up. Owners note dialing rebound in is what keeps the bike planted.
- Compression: start around the middle. Add compression if you're blowing through the travel or bottoming; reduce it if small bumps feel sharp.
- Lighter riders / smooth trails: less preload and lighter compression for a compliant, high-traction feel.
- Heavier riders / aggressive or jumpy terrain: more preload and firmer compression to hold the bike up in its stroke and resist bottoming.
- Method: change one thing at a time in small increments (a turn or a click), then ride the same section to compare.
Always tune within the shock's marked adjustment range, and never ride with mounting hardware anything less than fully torqued.